Chain Reaction: 4 Ways to Crochet Your First Row Like a Pro
- Rebekah Cardenas

- Sep 9, 2025
- 5 min read
Every crochet project begins with a foundation chain—but did you know there are four distinct ways to work into it, each creating a different result for your first row and the overall feel of your piece? Whether pursuing maximum stretch, a neat bottom edge, or a specific look suited for your yarn or project type, mastering these methods gives your work a professional edge from the very first stitch. In this guide, we'll shed light on the back loop only, front loop only, both loops, and the back bump techniques, complete with step-by-step instructions and detailed videos for each method.

Follow along to learn how to crochet into:
Back Loops Only
Crocheting into the back loops only is a versatile technique favored for creating a stretchy, flexible start to crochet projects. In a foundation chain, the back loop refers to the top loop of each chain ‘V’ visible from the front or the loop that is facing away from you.

Insert your hook from the front of the chain, poking it through just the back loop and out the back, leaving the front loop unworked and visible below.

Working your first row of stitches into just the back loops leaves the unworked front loops visible along the underside of your fabric. This results in a decorative line and a notably stretchy foundation edge, ideal for projects needing plenty of give (like the cuffs of hats, sleeves, necklines, or ribbed details). Plus, it creates accessible loops along the bottom edge, making it easy to crochet a border, edging, or decorative finish to the project later on.

If you’d like to see this technique in action, I’ve included a video in this article, which demonstrates how to crochet into the back loops of the chain for a neat, stretchable edge and an easy border foundation.
Front Loops Only
Crocheting into the front loops only is a simple technique that gives projects a clean, subtle textural effect and can influence both the look and flexibility of the starting edge.
To locate the front loop, hold your chain so the “V” shapes formed by each chain stitch are facing you. The front loop is the part of this “V” that sits closest to you—the lower edge when looking at the chain head-on.

Insert your hook into the front loop by starting at the front of the chain and sliding the hook under only the front loop, leaving the back loop untouched behind it. As you work each stitch, the hook goes front to back, catching just that nearest loop—for each subsequent stitch, repeat this motion along the row.

After completing your first row into the front loops only, you’ll notice the unworked "back bump" of the chain running along the underside of your fabric, and if you flip your stitches over, you'll notice the unworked back loops of your chain along the bottom of your stitches. These leftover loops create a subtle ridge or defined line below the stitches. This technique is useful when the project calls for an understated edge but needs a bit more structure than crocheting through both loops, and it can make adding a border to the opposite side easy. Crocheting into the front loops only also keeps the foundation chain flexible, making it ideal for garments, accessories, and pieces where visual interest or stretch is important.

If you’d like to see this technique in action, I’ve included a video in this article, which demonstrates how to crochet into the front loops of the chain for a neat, stretchable edge and an easy border foundation.
Both Loops
Crocheting into both loops of the chain is the my preferred method because it’s especially useful for projects where a denser, more stable foundation is desirable—such as amigurumi. When you insert your hook under both loops of the “V” in each chain, you leave only the back bumps visible beneath the stitches, resulting in a first row that is solid, closely woven, and much less stretchy than other techniques.
To crochet into both loops, hold your chain with the “V” shapes facing you. For each stitch, insert your hook under both top loops of the “V”—front and back loop together—then complete the stitch as your pattern calls for.

As you work across the chain, you’ll see the remaining “back bumps” (the small, horizontal ridges on the underside of the chain) below your first row of stitches.

This method produces a firmer, more refined edge; the fabric is dense and less flexible, making it ideal for amigurumi and other projects that will be stuffed or need structural integrity. Because the leftover loops under your stitches are minimized, you get a cleaner finish and the stitches on both sides of the chain sit closer together, reducing gaps and making it easier to work into the opposite side—perfect for starting shapes, rounds, or borders in toys and decorative pieces.
Choose this method for crochet projects where stuffing is involved or minimal stretching is preferred.
This approach also helps maintain the tidiness and durability of angled and multi-directional fabric, contributing to a polished, professional finish.

A demonstration video is linked here, showing how to crochet into both loops of the chain for a dense start, ideal structure, and a neat, seamless edge—ensuring you can follow along at your own pace.
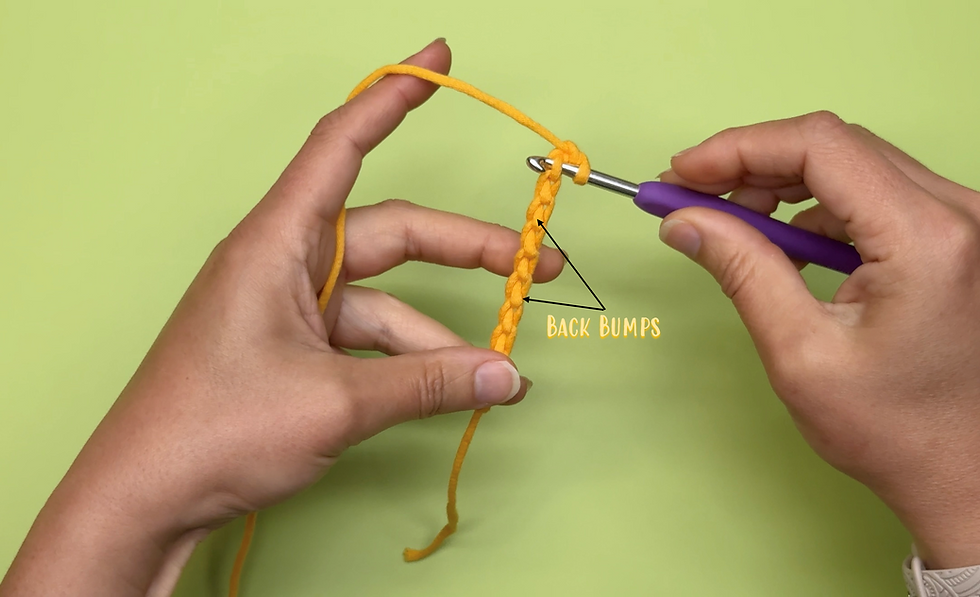
Back Bump
Crocheting into the back bumps of the chain is a favorite technique for creating a dense and polished beginning row, ideal for projects where the bottom edge is visible—like headbands, bracelets, or any piece that benefits from two matching edges.
Hold your chain so the front “V” shapes are facing away, then rotate the chain to see what looks like a spine along the back—these are the back bumps. To crochet into the back bumps, insert your hook under just this ridge, ignoring the loops of the “V” on the front.
After working across the back bumps, your first row of stitches sits snugly, leaving both front loops of the chain visible on the underside. This produces a uniform bottom edge that matches the top edge of the work, so both sides look nearly identical—perfect for fabric that won’t be bordered or hidden. The row is dense and less stretchy, preventing gaps and making your piece look neat and finished.

If you later need to crochet into the opposite side of the chain (such as for amigurumi or decorative borders), the exposed loops underneath are easy to access. The process is similar to working into both loops, but reversed—you’ll insert your hook under the visible loops along what was originally the underside of your chain.
This technique is ideal for items where both edges of the fabric are visible and should match, and for projects where minimizing stretch and gaps is a priority.
A demonstration video is linked here, providing visual support so you can see exactly how to crochet into the back bumps of the chain for tidy, professional results.
Wrapping Up
When crocheting into the foundation chain, you have a variety of methods to choose from, each bringing unique strengths to the first row of your fabric. From the stretchy, border-friendly edge of the back loop only method, the subtle texture of the front loop only method, and the dense, gap-reducing stability of working into both loops, to the professional, double-sided finish granted by crocheting into the back bumps—these techniques empower you to tailor every project for function and appearance. Selecting the right approach ensures your starting edge delivers the flexibility, strength, or matching finish your piece requires, whether you’re making accessories, amigurumi, or heirloom gifts.
If you ever have questions, need clarification, or want to see these methods in action, I invite you to reach out for support. There’s a full tutorial video linked right here where I demonstrate each foundation chain technique and explain the best context for using them. With a little practice and the right guidance, every crocheter can master starting rows for flawless, beautiful projects—so don't hesitate to ask for help or explore the full tutorial for deeper insight.
Happy crafting!


Comments